


One of the questions we're most often asked is, "how do I download and install my Digital Certificate to my phone?" If you want to encrypt emails or authenticate to corporate networks using your mobile device, installing the certificate can be a bit of a barrier. Fortunately, Digital Certificates are compatible with most of the leading mobile operating systems, so it's easy to implement and enforce the same security policies, even on mobile devices.
You can view the full 'how-to' video here or continue reading for the in-depth guide.
Note: This post is about how to install certificates onto devices. If you’re looking for information about what mobile certificates can be used for, please visit our mobile page.
The method involved in installing Digital Certificates onto your mobile device will vary by operating system. To help you support mobile devices in your workplace, we've put together a user guide that walks through how to install a Digital Certificate or PKCS#12 file onto an Android phone. The overall process is really simple; let's take a look now:
A couple things before we get started...
- This example will show you how to install a PKCS#12 (as opposed to other file types) onto an Android device, which is our recommended option as the file type is easily accepted and provides the simplest installation experience for the end user.
- I'm running through this using a GlobalSign Digital Certificate and GlobalSign's certificate issuance process, but the general steps should be the same regardless of the supplier and issuing Certificate Authority.
There are two main parts to downloading and installing a certificate on an Android device - downloading the PKCS#12 or .pfx file onto the Android and adding it to the device's "credential store". We will take you through the steps involved in each part now. Let's get rolling!
How to Download a Certificate onto Your Android Device
Step 1 - Open Certificate Pick Up Email on Android Device
Certificate delivery is completed using an over-the-air enrollment method, where the certificate enrollment is delivered directly to your Android device, via email using the email address you specified during the registration process.
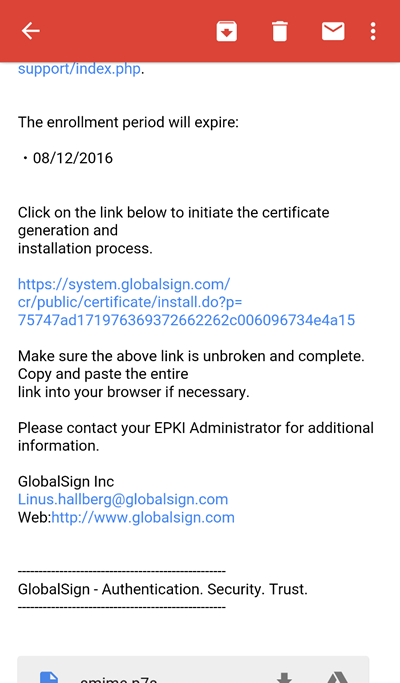
Click the link in your certificate pick up email.
Step 2 - Enter Certificate Pick-Up Password
Click on the enrollment link in the email. Next, you will be prompted to enter the one-time certificate password you created (or an administrator created for you), during the certificate ordering process.
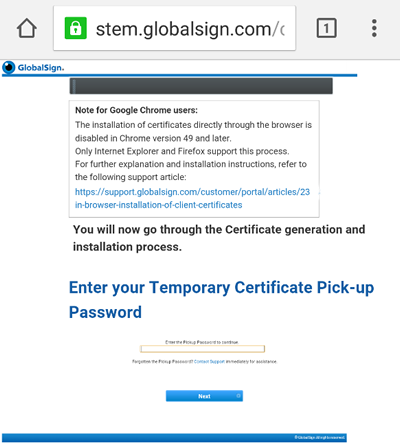
Enter your certificate pick up password when prompted.
Step 3 - Create a PKCS#12 Passphrase
Next, create the password you will use when you install the certificate onto your device (covered in the next section). Our system asks that your password is no less than 12 characters and is only alpha-numeric. That means no special characters. Make sure you read our subscriber agreement and click ‘I agree’ to proceed.
Create the password you will use during the install process.
Step 4 - Download the Certificate onto Your Device
After your certificate has been generated, you will be prompted to download the certificate to your device. The file will appear in the ‘downloads’ folder on your device.
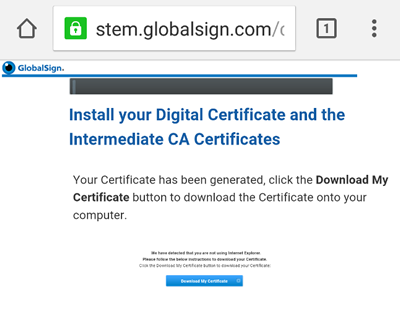
Download the certificate onto your device.
Step 5 – Name Your Certificate
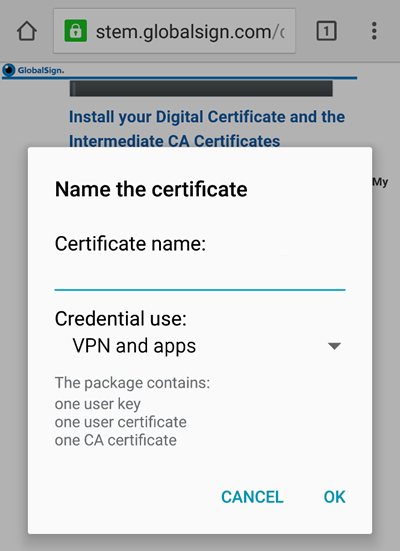
Give your certificate a name so you can easily find it in your certificate store later.
How to Add a Certificate to Your Android 'Device Credentials'
At this point you may have a warning on your phone saying ‘network may be monitored by a trusted third party’. Technically what Android is saying here is ‘if a malicious or compromised certificate is being installed here then it’s possible someone is monitoring you.’ So the warning is made a little scarier than it needs to be because a certificate doesn’t have to be genuinely malicious to trigger the warning. In the Android developer community people are calling for this feature to be removed. So fear not, let’s move onto the next step.
To complete the install and remove that pesky warning, you need to add the certificate to your device's security credentials.
Step 6 - Navigate to Settings > Security
Select "Install from device storage" from your security settings to get the certificate file from the ‘downloads’ folder of your device.
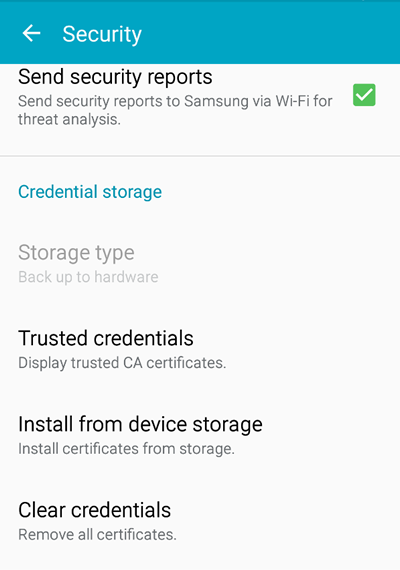
Select "install from phone storage" to find your recently downloaded certificate.
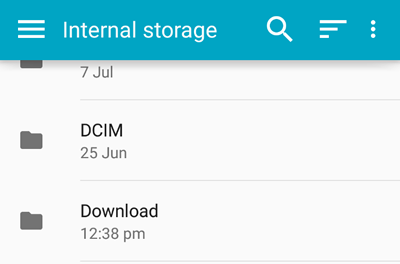
Step 7 - Locate Your Downloaded Certificate File
You should be able to find the ‘downloads’ folder in the left hand menu as soon as you click on ‘Install from device storage’.

If you can’t find it, you can navigate there by clicking "Internal storage" from the list of locations in the "Open from" window. Then navigate to the "Download" folder and select your certificate .pfx file.
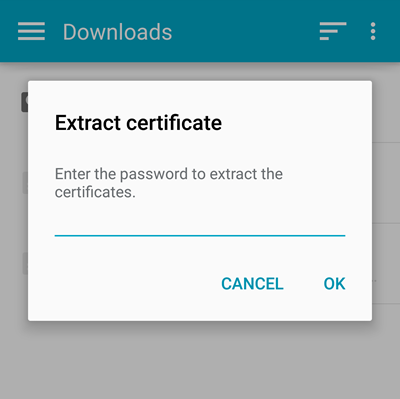
Step 8 - Enter Your PKCS#12 Passphrase
Enter the password you created in Step 3 above.
Enter the PKCS#12 passphrase you created earlier.
Step 9 - Adjust Certificate Settings
Now that the certificate has been added to your device's credentials, you can set the certificate name and its use - VPN and Apps or Wi-Fi depending on where you plan on using the certificate to authenticate.
Little is known about why this option is given. A certificate should always be able to do both. My advice is to pick the one which is closest to what you want to do with your certificate, but it won’t matter which one you chose as you should still be able to authenticate into both services with an X.509 certificate from GlobalSign.
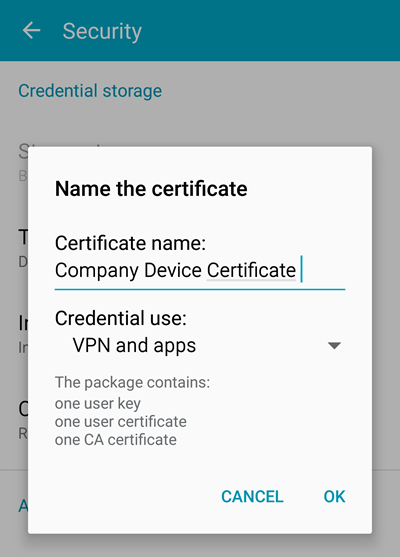
Set your certificate name and purpose.
Installation complete!
The certificate is now successfully downloaded onto your Android device. You can now use it as an authentication factor for connecting to VPN clients, Wi-Fi, email and other corporate apps, as well as for digitally signing and encrypting emails (S/MIME).