

Once you understand the differences between digital signatures and electronic signatures, you’ll realize there’s another choice to make - the type of digital signature you use. If you’re using Adobe applications, your options are to
- Digitally sign (sometimes called an approval signature) or
- Certify the document.
Luckily, the differences and use cases are very clear.

Certificate-based signing options in Adobe Acrobat Pro DC.
Method One: Digitally Sign the Document (aka Add an Approval Signature)
Adding a digital signature is probably what you think of when you think of an electronic signature – basically, the virtual equivalent of physically signing the document in paper form. In the past, you could only digitally sign PDFs in Adobe Acrobat, but recently this feature was added to Adobe Reader as well.
Example approval signature in Adobe Acrobat. You can see the name of the signer, an image of the signer’s physical signature and a timestamp. Signature is clickable to view more details about the signer.
In this context, digital signatures are sometimes called approval signatures and expedite an organization’s approval procedure by capturing the electronic approvals made by individuals or departments and embedding them within the actual PDF. They do exactly what the name implies, proving that you and any other signers, have approved the content of the document.
You have the option of locking the document after the signature is applied. Now, part of the appeal and much of the value of digital signatures comes from the content check that goes on behind the scenes when a signature is validated – basically, the contents of the document from when the signature was applied are compared to the contents at the time it’s validated (i.e. when someone opens the document). If there’s a mismatch, an error message is shown. We have a post that explains how this works, if you are interested.
So, the phrase “locking” the document here is maybe a little misleading. As we just explained, the majority of the document contents are “locked” once you apply your signature. In this case, locking the document means no additional signatures, annotations, or form fill-ins would be allowed. The document would be on total lock-down. If you want to allow any of these types of changes, this option is not for you. Instead, you should consider certifying the document, which gives you more granular control over which types of additions can be made post-signing.
Method Two: Certify the Document
Certifying a document is sometimes referred to as sealing the document. Unlike the digital or approval signatures we just discussed, you can only certify a document once and you cannot certify if the document already has a digital signature. This means certifying is usually done by the author or creator of the document, before it’s published or sent for additional signatures or form fill-ins.
Note: As of now, you can only certify using Adobe Acrobat. Reader doesn’t support this ability.
Certified documents display a blue ribbon across the top of the document, which contains the signer’s name, their company and the certificate issuer – which is a clear, visual indicator of document authenticity and authorship.

Example certified document in Adobe Acrobat. You can see the name of the signer, their company, and the Certificate Authority (CA) that issued the certificate.
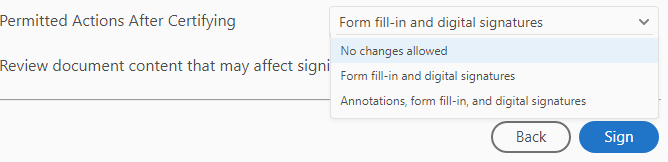
As mentioned above, certifying a document gives you more control over which types of content can be added post-signature. You have one of three options for choosing which actions are permitted after certifying:
Option 1. Annotations, form fill-in, and digital signatures
This permits the addition of annotations, which are useful when collaborating on document creation and the addition of form fill-ins, which allows document recipients to fill in any pre-set form fields. It also allows more digital signatures to be added.
Option 2. Form fill-in and digital signatures
This allows the same changes as the first option, but without annotations. This option is commonly used when multiple signatures are needed within a single document or if you are sending a form out to collect data.
Option 3. No changes allowed
This completely locks the document down so that no changes can be made, including form fill-in and additional digital signatures. This option is commonly used in contracts or policy documents where the author or publisher wants to ensure nothing can be added. Other uses include engineering drawings and protecting intellectual property (e.g. research reports, lab results, etc).
Invisible vs. Visible Signature Option
You are given the choice to certify a document with a visible or invisible signature. Certifying a document with a visible signature is used when the author of the document needs to sign the document (i.e. have a visible signature line, like the digital signature option described above). Certifying with an invisible signature allows the author of the document to control the actions permitted after certifying without including a signature of their own. This is commonly used when you need to provide document authenticity, integrity and origin assurances, but don’t need a visible signature line.
Final Considerations
I think it’s worth repeating this - once a document has been digitally signed, you lose the ability to certify that document. You must certify first or not certify at all.
Another repeat, but also very important – you can only digitally sign, not certify, in Reader and that is a fairly recent ability. If you are using an older version, you might not have this capability. Adobe Acrobat has supported both digitally signing and certifying for years. If you don’t generally author documents, it’s likely you’ll only ever need to digitally sign with an approval signature.
Both visible certifying signatures and digital signatures can be customized to include an image (e.g. your physical signature or official seal) and various signature details (e.g. signing location, date, reason for signing).
Both digital and certifying signatures will include a timestamp. The important thing to note here is the source of that timestamp – either your system clock or one provided by a trusted third party. This will make a world of difference when it comes to non-repudiation and legal admissibility. A timestamp from your computer’s system clock will not hold up since clocks can easily be changed. If you need to support audit trails, time-sensitive transactions, or just want to ensure people know when your signature was actually applied, you should make sure it is tied to a trusted RFC 3161-complaint timestamp authority. Signatures applied in Adobe Acrobat and Reader with GlobalSign certificates automatically include a trusted timestamp.
Finally, it’s important to remember that all digital signatures, both visible/approval and certifying, provide significant business value and peace of mind over other types of electronic signatures, especially when it comes to meeting regulatory compliance, because they support:
- Authentication of the Signer – a third-party verified identity is used to apply the signature. Document recipients can actually interact with the signature and see more details about the signer’s identity. Unlike other types of electronic signatures, it’s not just an image that gives you no further information.
- Non-repudiation – the signature is applied with your private key, which is tied to your verified identity and computationally infeasible to “guess”. So, unless your key has been compromised, you can’t deny you signed the document.
- Document Integrity – as discussed above, adding a digital signature creates a tamper-evident seal on the document contents. This capability is one of the major drivers in adoption.
- Timestamping – as discussed above, third party timestamps can be incorporated into signatures, rather than relying on system clock, which can be manipulated. This way you know for certain that the signature was applied when it actually was.
Have other questions about digital signatures? Let us know; we’re happy to help.